I am currently in the midst of radically changing the OS X experience at my company. Users will be going from monolithic/unmanaged to a self-service/managed model. This could be jarring for them and without proper user training, they could easily miss some of the key features we would like them to know about.
Enter Yo. Written by Craig Shea and utilizing Swift, it allows you to target Notification Center.
By utilizing Outset, Luggage, and Yo, we can create a user login condition that will notify the user of available documentation.

Let’s begin…
On a test machine, install the latest versions of Luggage, Outset and Yo. It will help to have Pages, Xcode and the Xcode command line tools as well.
Create a working directory. When playing with things like this, I prefer the desktop. Let’s open terminal.
mkdir -p ~/Desktop/YoExample
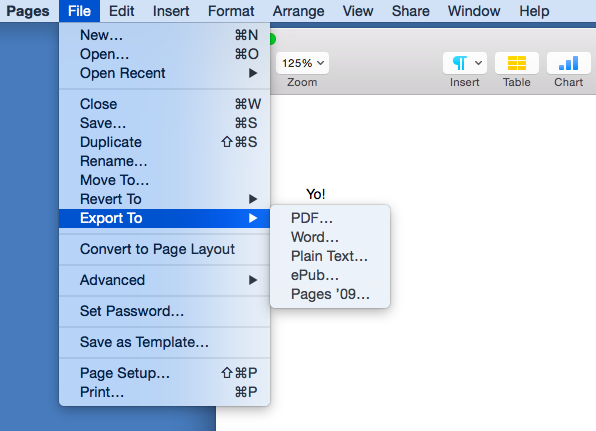
If you have Pages, go ahead and make a document, export as a PDF and save it to our working directory. In this example, let’s use yo.pdf.

Outset is a powerful tool that allows you to run packages/scripts at various stages. Let’s create a script and save it in our working directory. Outset requires that your scripts contain the proper extension, so don’t forget it.
Once again in terminal:
cd ~/Desktop/YoExample
nano yo.sh
This will bring up a command line editor called nano. Nano is a replacement for pico and recommended by Apple for modifying configuration files.
Inside nano let’s copy/paste the following:
#!/bin/sh
/Applications/Utilities/Yo.app/Contents/MacOS/yo\
	-t "Yo is awesome" \
	-s "To view the document" \
	-n "Please click on Open PDF" \
	-b "Open PDF" \
	-a "/Library/Documentation/Yo.pdf" \
	-p \
	-z "sms_alert_note"
Once entered, press ctrl+o to write the file. It will confirm the name you previously entered - hit enter to save. If done correctly, you should now have a bash script file located in your working directory.
Craig has some great documentation. Let’s look at the values we have setup.
-t, --title:
Title for notification. REQUIRED.
-s, --subtitle:
Subtitle for notification.
-n, --info:
Informative text.
-b, --action-btn:
Include an action button, with the button label text supplied to this argument.
-p, --poofs-on-cancel:
Set to make your notification 'poof' when the cancel button is hit.
-a, --action-path:
Application to open if user selects the action button. Provide the full path as the argument.
This option only does something if -b/--action-btn is also specified. Defaults to opening nothing.
-z, --delivery-sound:
The name of the sound to play when delivering. Usually this is the filename of a system sound minus the
extension. See the README for more info.
We are going to have a title, subtitle and informative text. For a little flair, we will have the notification “poof” if a user hits cancel. By pointing to a private framework sound, we can also use the same alert that a user will hear when receiving an iMessage (located at /System/Library/PrivateFrameworks/ToneLibrary.framework/Versions/A/Resources/AlertTones/Modern/). The action path itself can point to anything and invokes the open command. The options are endless.
If you are paying attention, you’ll notice this script is pointing to /Library/Documentation/yo.pdf. How might one get this file to this location? You could manually move it for this test or build a pkg with Packages, but let’s take a slightly different approach.
Luggage
Enter Luggage, a great tool that doesn’t seem to get a lot of blog posts. For this post we won’t go too in depth, but let’s do a quick overview.
Luggage allows you to easily create a package, based on a set of parameters through the use of a Makefile.
Let’s use nano once again to make our file.
cd ~/Desktop/YoExample
nano Makefile
Copy/paste the following code and save it.
USE_PKGBUILD=1
include /usr/local/share/luggage/luggage.make
PACKAGE_VERSION=1.0
TITLE=YoDocumentationExample
REVERSE_DOMAIN=com.github.erikng
USE_PKGBUILD=1
PAYLOAD= \
		pack-usr-local-outset-login-once-yo.sh \
		pack-Library-Documentation-yo.pdf

l_usr_local_outset_login_once: l_usr_local
	@sudo mkdir -p ${WORK_D}/usr/local/outset/login-once
	@sudo chown -R root:wheel ${WORK_D}/usr/local/outset/login-once
	@sudo chmod -R 755 ${WORK_D}/usr/local/outset/login-once

pack-usr-local-outset-login-once-%: % l_usr_local_outset_login_once
	@sudo ${INSTALL} -m 755 -g wheel -o root "${<}" ${WORK_D}/usr/local/outset/login-once

l_Library_Documentation: l_Library
	@sudo mkdir -p ${WORK_D}/Library/Documentation
	@sudo chown root:admin ${WORK_D}/Library/Documentation
	@sudo chmod 775 ${WORK_D}/Library/Documentation

pack-Library-Documentation-%: % l_Library_Documentation
	@sudo ${INSTALL} -m 644 -g admin -o root "${<}" ${WORK_D}/Library/Documentation
Let’s briefly discuss what we are doing here.
l_usr_local_outset_login_once tells Luggage to make the directories for Outset (if they don’t already exist) and ensure proper permissions. l_Library_Documentation does the same thing for our Documentation folder.
pack-usr-local-outset-login-once tells Luggage to install our script into the correct Outset folder (calling the l_usr_local_outset_login_once) and pack-Library-Documentation installs our PDF.
With our Makefile in hand, let’s generate our pkg file.
In terminal type:
make pkg
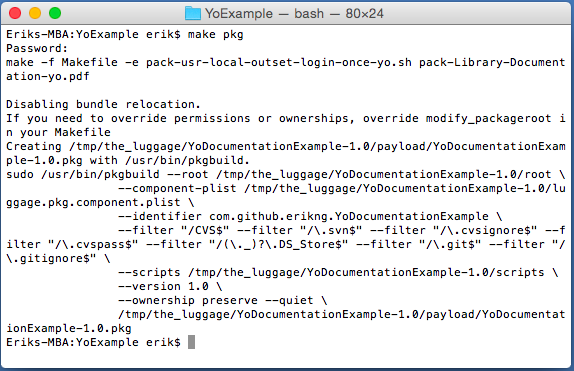
Luggage will ask you for your password. If everything goes right, a package will be generated in your working folder called YoDocumentationExample-1.0.pkg and terminal will look something like this.
Please note that Luggage is very particular with tab spacing and it is possible that wordpress will strip them. See the bottom of the post for the actual files.

With your package in tow, install it, reboot (or logout) and log back in to see your notification appear.

If you click on Open PDF, you should see something like this:

Great! You have a fully functioning setup for all users, and a deployable package. You can stop here but what if you want more?
What if you want to change the icon on the alert? For this, we will need to download the source files and modify them in Xcode. Back in terminal let’s use git to clone Craig’s github repository. Make sure you have already installed Xcode and the command line tools prior to running this command or it will fail.
cd ~/Desktop/YoExample
git clone https://github.com/sheagcraig/yo.git
Browse to your YoExample folder, and a new folder called yo will now exist. Double click on yo.xcodeproj to open the project in Xcode.
Expand the root yo folder, the sub folder called yo and the Supporting Files folder. Click on Images.xcassets and then click on AppIcon. Drag and drop any PNG image (size 128x128) into the Mac 128pt 1x area and replace the original icon. Here is a great icon you could use.

![]()
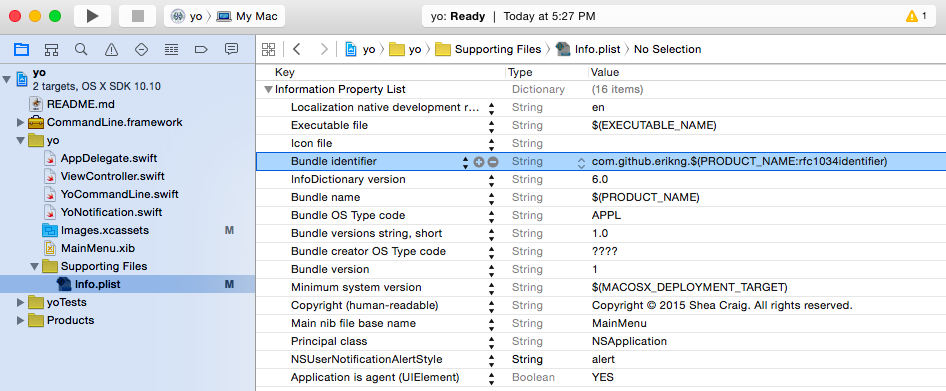
Now that we’ve replaced the icon, let’s change the BundleIdentifier to ensure our new icon will take effect. Click on Info.plist and change the bundle identifier to something you see fit. In this example let’s use com.github.erikng.

With our changes made, let’s save the project (CMD +S) and build our project (CMD+B).
By default Xcode saves projects to ~/Library/Developer/Xcode/DerivedData.
Once there, you should find a folder called yo-xxxxxxxxx. Expand that folder and continue down the rabbit hole.
~/Library/Developer/Xcode/DerivedData/yo-xxxxxxxxx/Build/Products/Debug
You should see an application bundle with your new (awesome) icon. Copy this bundle to our original working folder ~/Desktop/YoExample.
Have I told you how awesome Luggage is? It’s awesome. Let’s change the payload section of our Makefile. Using nano or your favorite text editor, change the payload section to the following:
PAYLOAD= \
		pack-usr-local-outset-login-once-yo.sh \
		pack-Library-Documentation-yo.pdf \
		pack-utilities-yo.app
Once again in terminal browse to your working directory and make pkg.
cd ~/Desktop/YoExample
nano Makefile
Your package will regenerate and now include your customized application. Install the new package, log out and log back in and your notification should re-appear, but look different.

Congrats! You now have a customized notification that will appear for all of your users and a package you can deploy out with your favorite deployment tool.
If you’d like to use my own example go here for all the necessary files.