Three months to the day I announced that AirWatch had released custom DEP in AirWatch 9.1. This was a limited release due to a few outstanding issues with mdmclient, especially in regard to the InstallApplication command. With macOS 10.12.6, Apple has now resolved these bugs and AirWatch feels comfortable with releasing this to all AirWatch customers.
As of today, AirWatch 9.1.3 has now been put into General Availability. In this blog post, I will show you how to quickly setup DEP in a brand new AirWatch environment so you can quickly get started on your custom DEP adventure.
Requirements
- DEP Portal access https://deploy.apple.com
- AirWatch 9.1.3 On-Premise/Dedicated Cloud/Shared Cloud
- A signed/distribution package for deployment (I recommend using InstallApplications)
Configuring AirWatch
Although AirWatch is a beast of a console, you can get custom DEP setup in about 15 minutes.
Configuring DEP Stage 1 - Registering with Apple
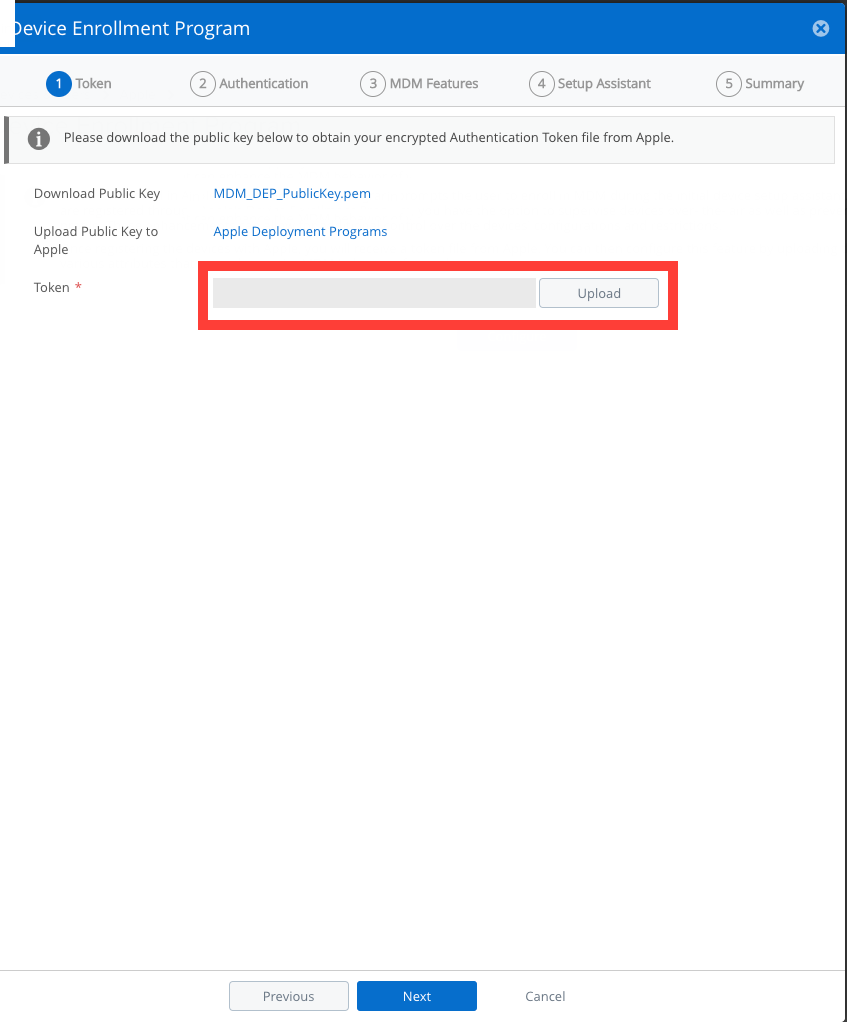
- Go to Groups & Settings -> All Settings
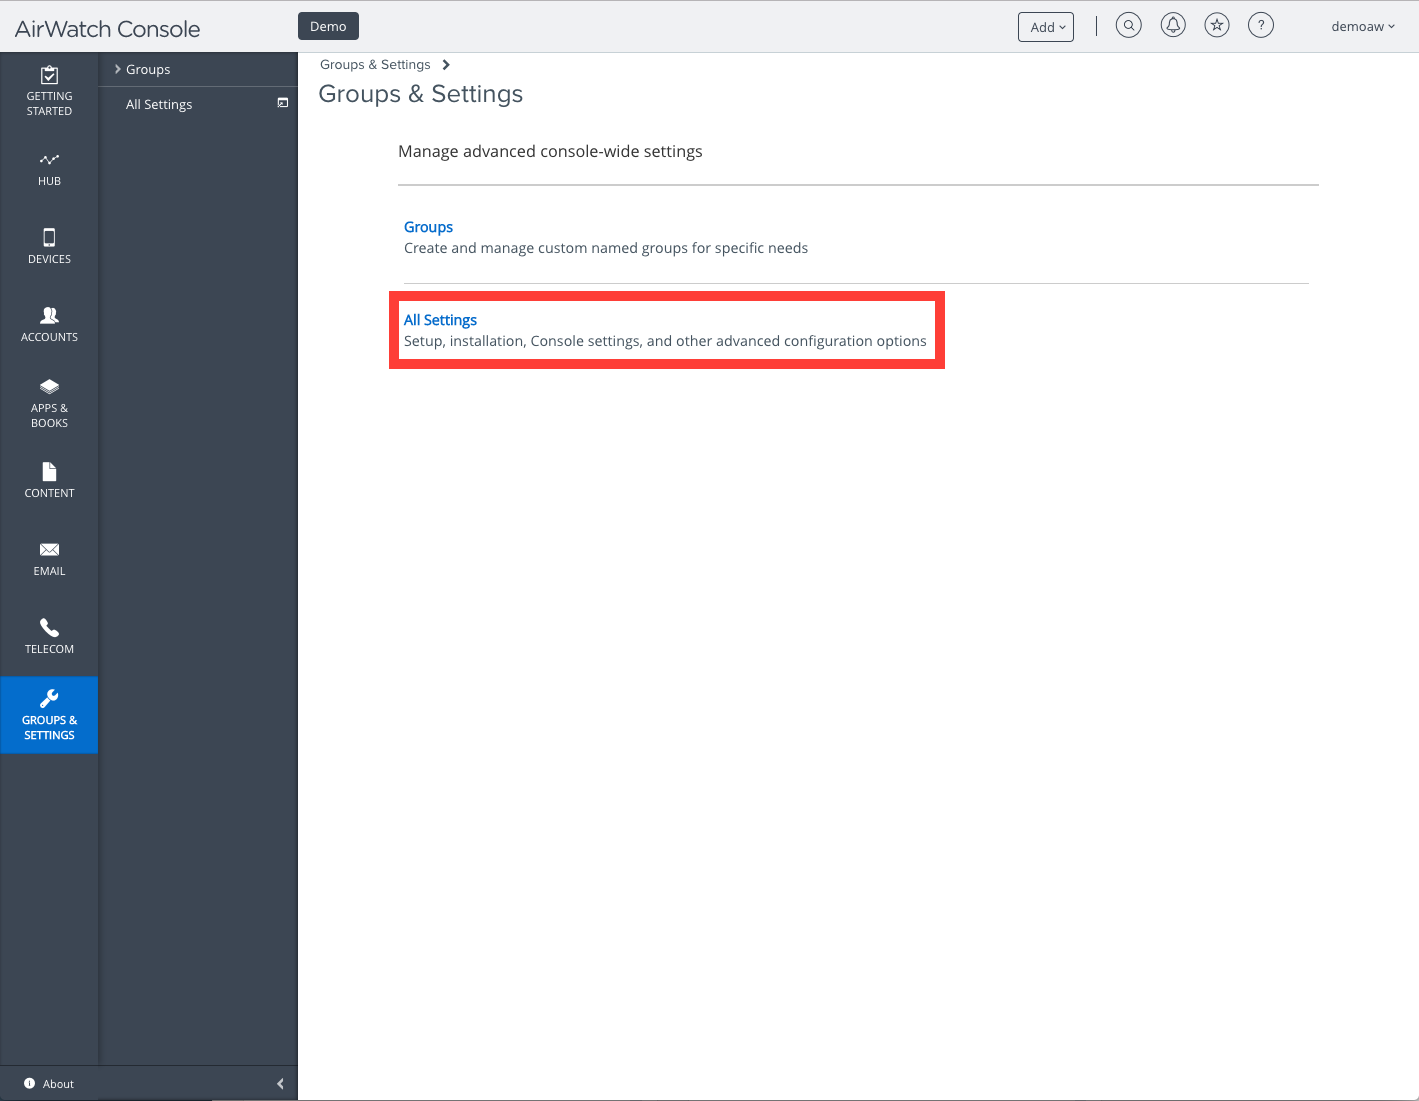
- Go to Devices & Users -> Apple -> Device Enrollment Program -> Configure
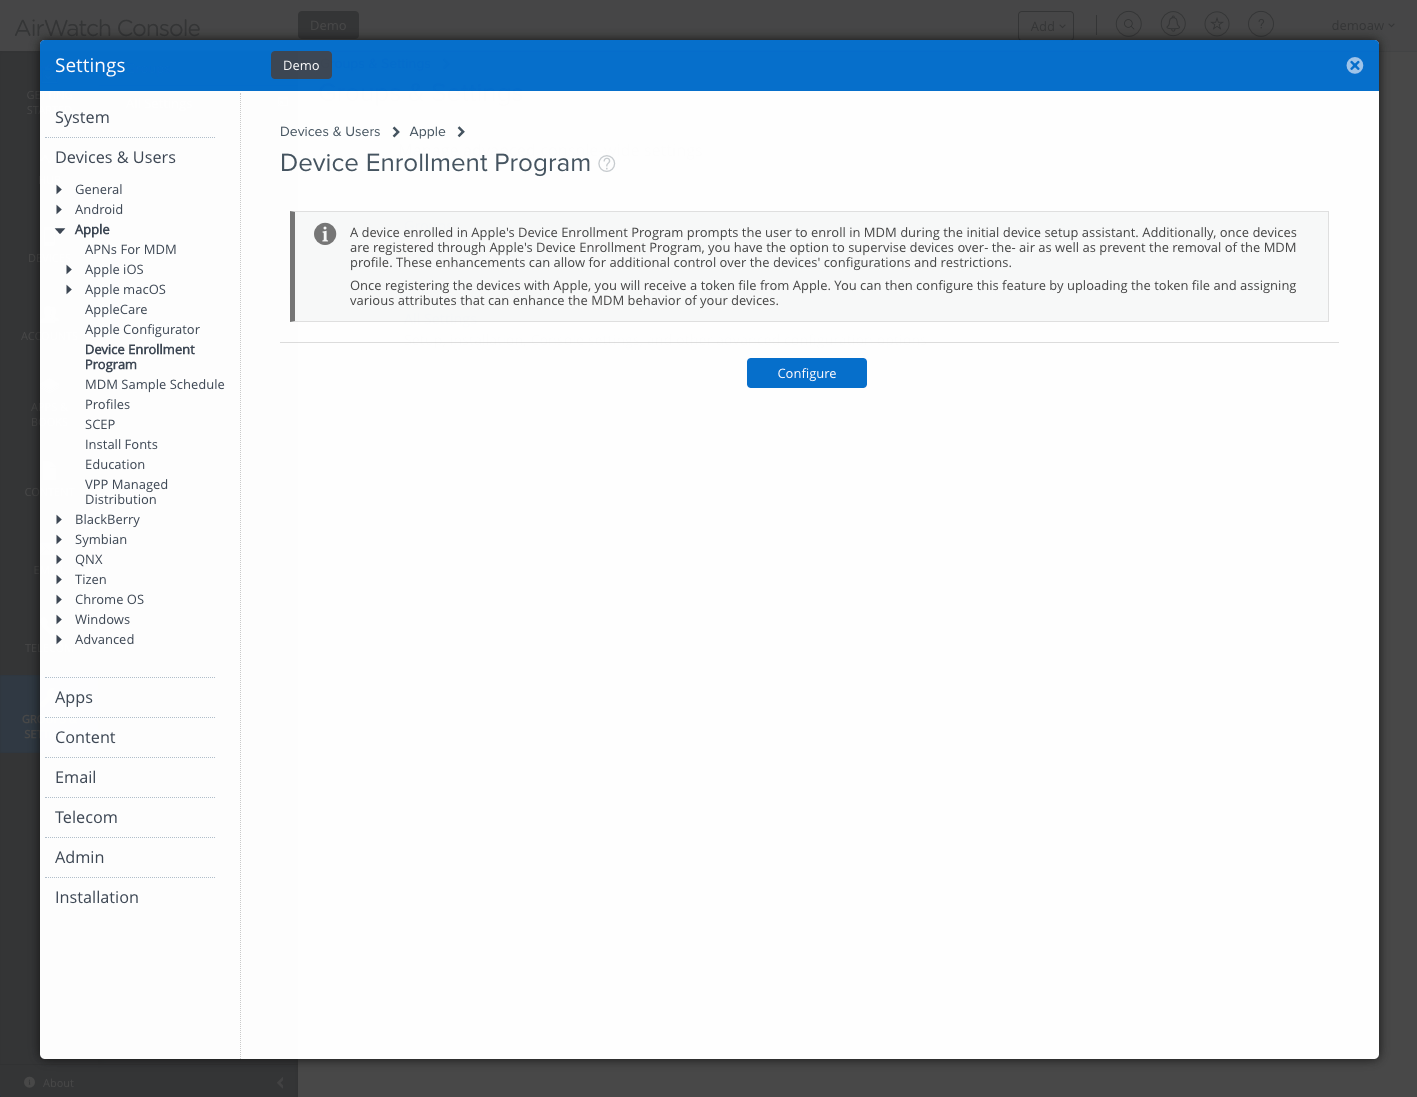
- Download the Public Key that is provided by AirWatch
- Leave this AirWatch tab open as you will come back to it
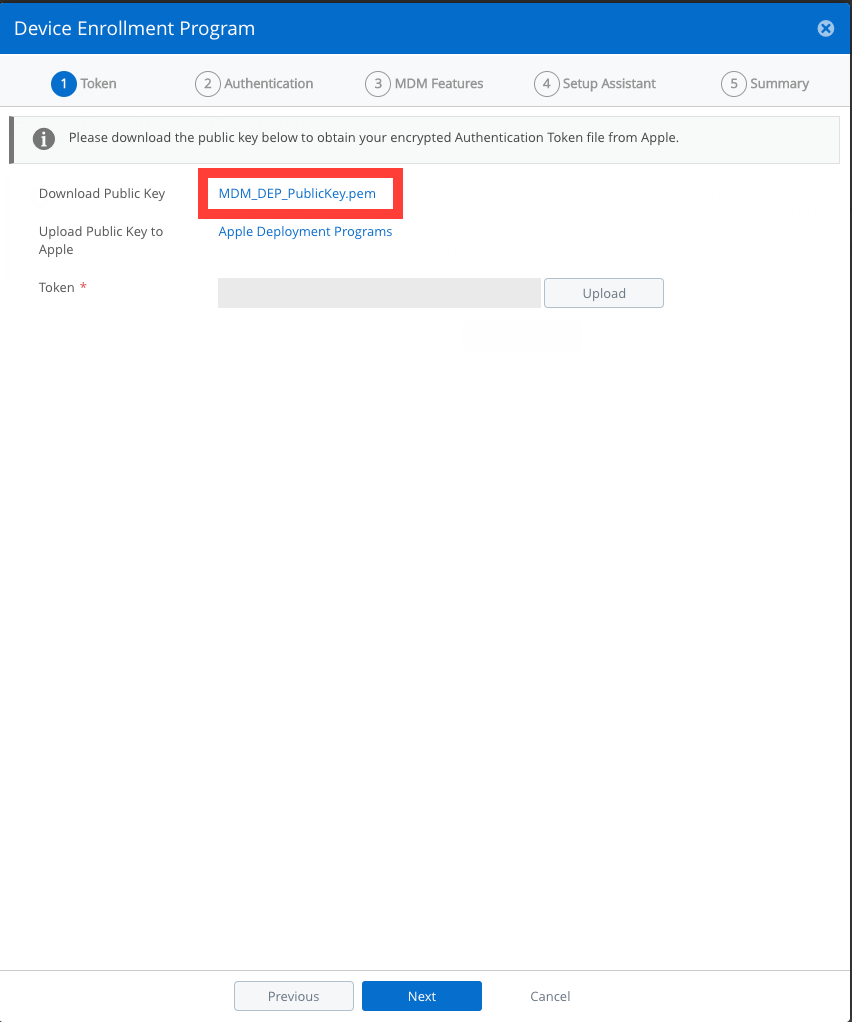
- In other tab, go to https://deploy.apple.com and sign in with your DEP Apple ID.
- Once signed in go to Device Enrollment Program -> Manage Servers -> Add MDM Server
- Give your MDM/DEP Server a name and then upload the Public Key you downloaded from AirWatch.
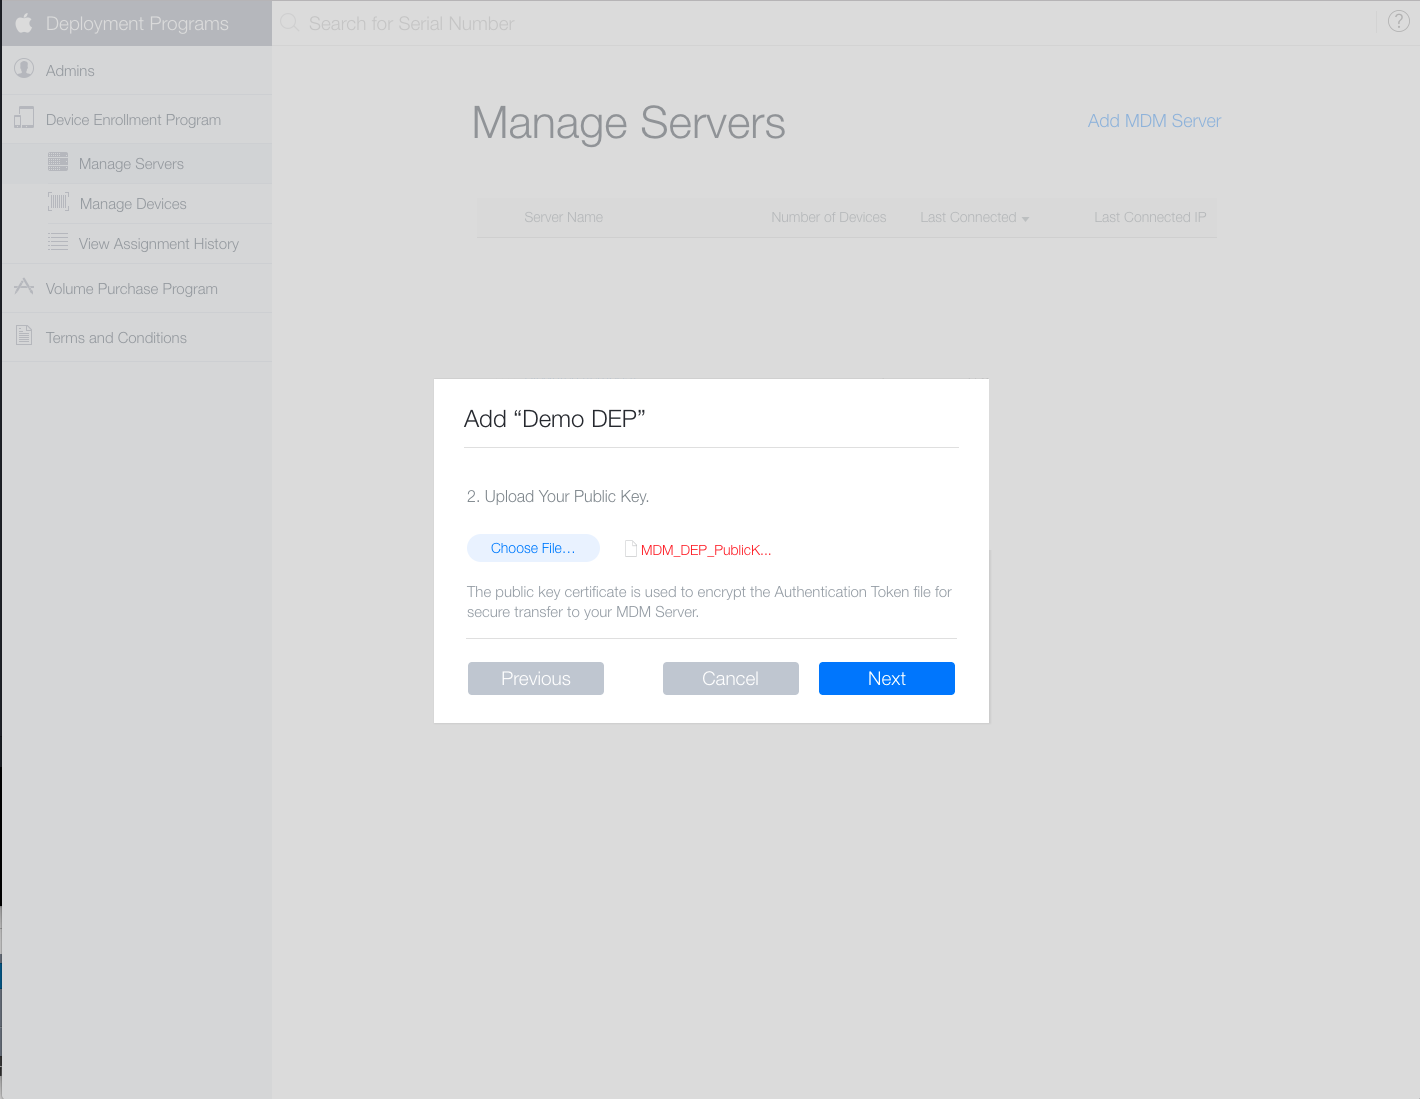
- Download the Server Token and hit Done
- Keep the Apple DEP page open.

- Back in the AirWatch tab, upload the Server Token
Congrats - you now have DEP configured - now to the fun stuff.
Configuring DEP Stage 2 - Configuring DEP Profile
Notes
While you can have DEP unauthenticated, I feel this leaves your DEP server in a vulnerable state - an attacker would only need to know one serial number from your fleet.
Because of this, the following tutorial will make an assumption that all macOS devices will require authentication to fully register in DEP.
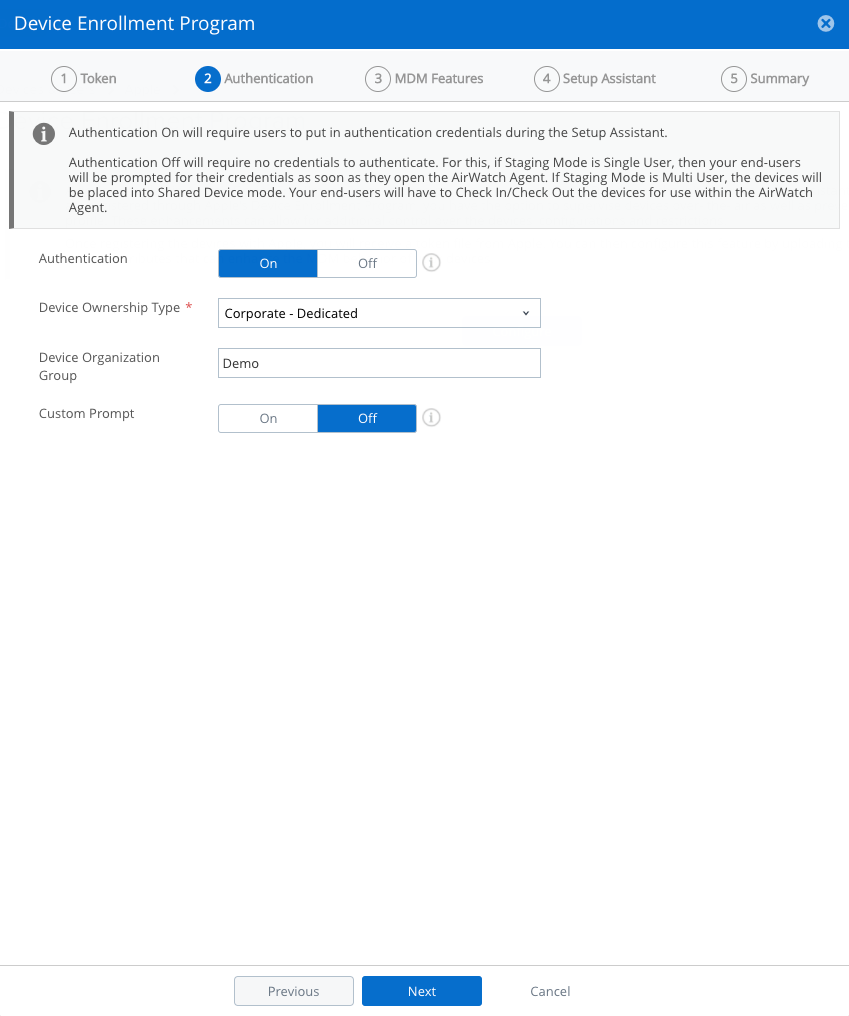
Configuring DEP Authentication
- Turn Authentication to On
- Configure the Device Ownership Type to Corporate - Dedicated
- Select your Device Organization Group
- Turn off Custom Prompt (This is to customize the macOS authentication box.)
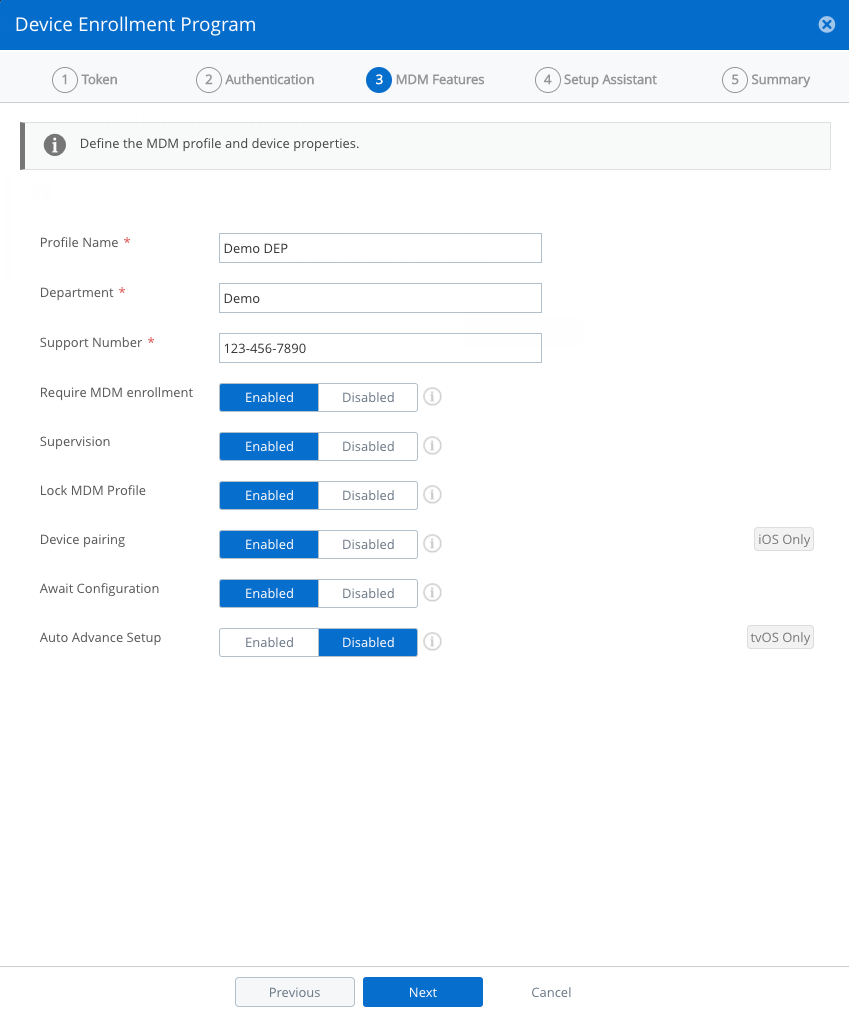
Configuring DEP Features
- Give your Profile Name a name
- Set a Department name
- Configure a Support Number
- Ensure Require MDM enrollment is set to Enabled
- Ensure Supervision is set to Enabled
- Ensure Lock MDM Profile is set to Enabled
- Ensure Await Configuration is set to Enabled
These four settings will ensure that DEP is mandatory for all macOS devices. Await Configuration is an interesting command in that your custom DEP package will begin to download (and possibly install if it’s very small) prior to the SetupAssistant finishing.
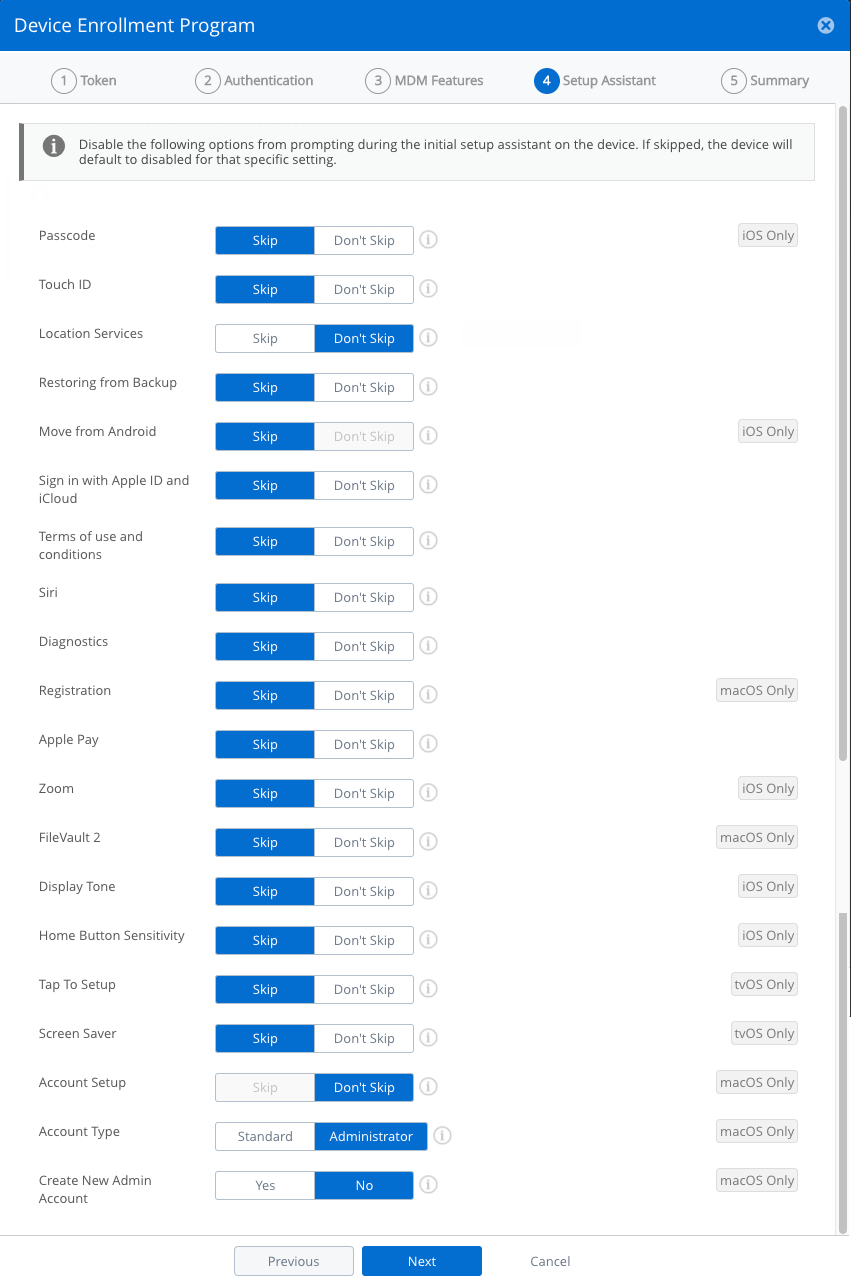
Configuring DEP SetupAssistant
For most custom DEP enrollments (especially ones that require authentication), there will only be a few settings that administrator cares about.
- Ensure Location Services is set to Don’t Skip
- Ensure Account Setup is set to Don’t Skip
- Ensure Account Type is set to Administrator
- Ensure Create New Admin Account is set to No
This will allow the user to enable location services (to properly setup the timezone) and give them administrative rights to the machine.
Saving DEP Profile
Once you have finalized your settings, you will be sent to a confirmation window.
- Ensure Sync Now and Assign to All Devices is set to Yes to assign this DEP profile to your devices.
- Ensure Auto Assign Default Profile is set to Yes to assign new DEP devices to this profile.
- Hit Save
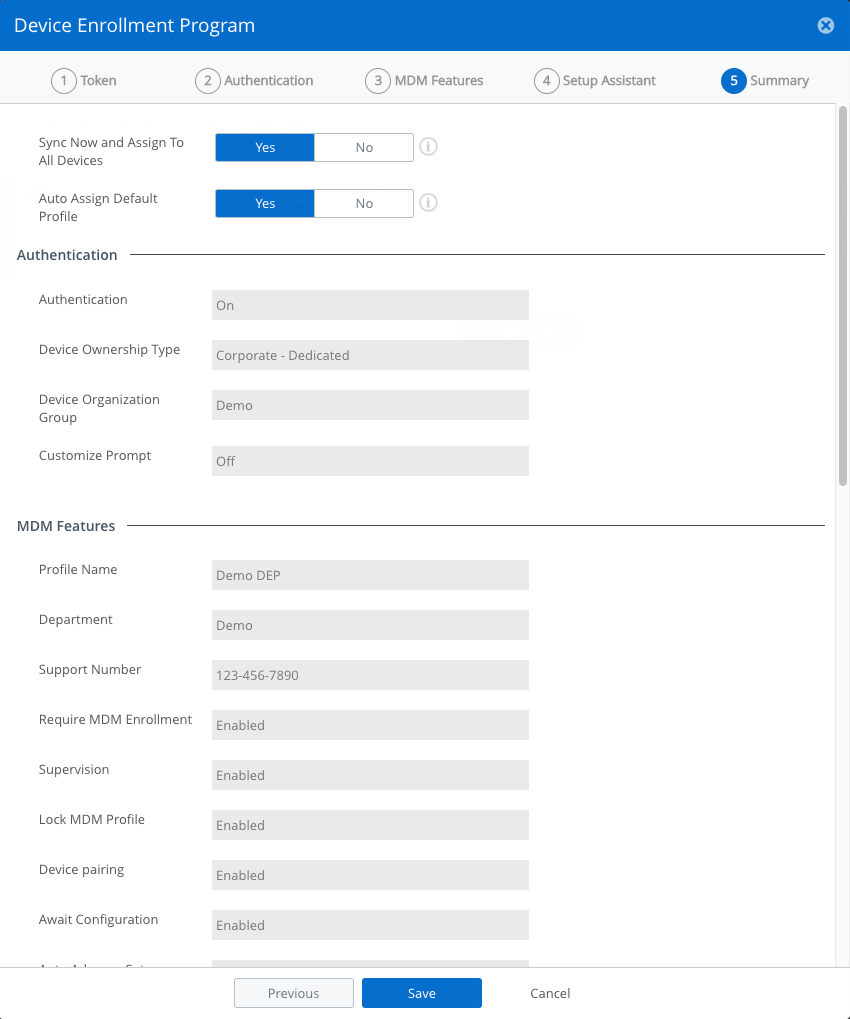
If everything is complete, you should see a window like this.
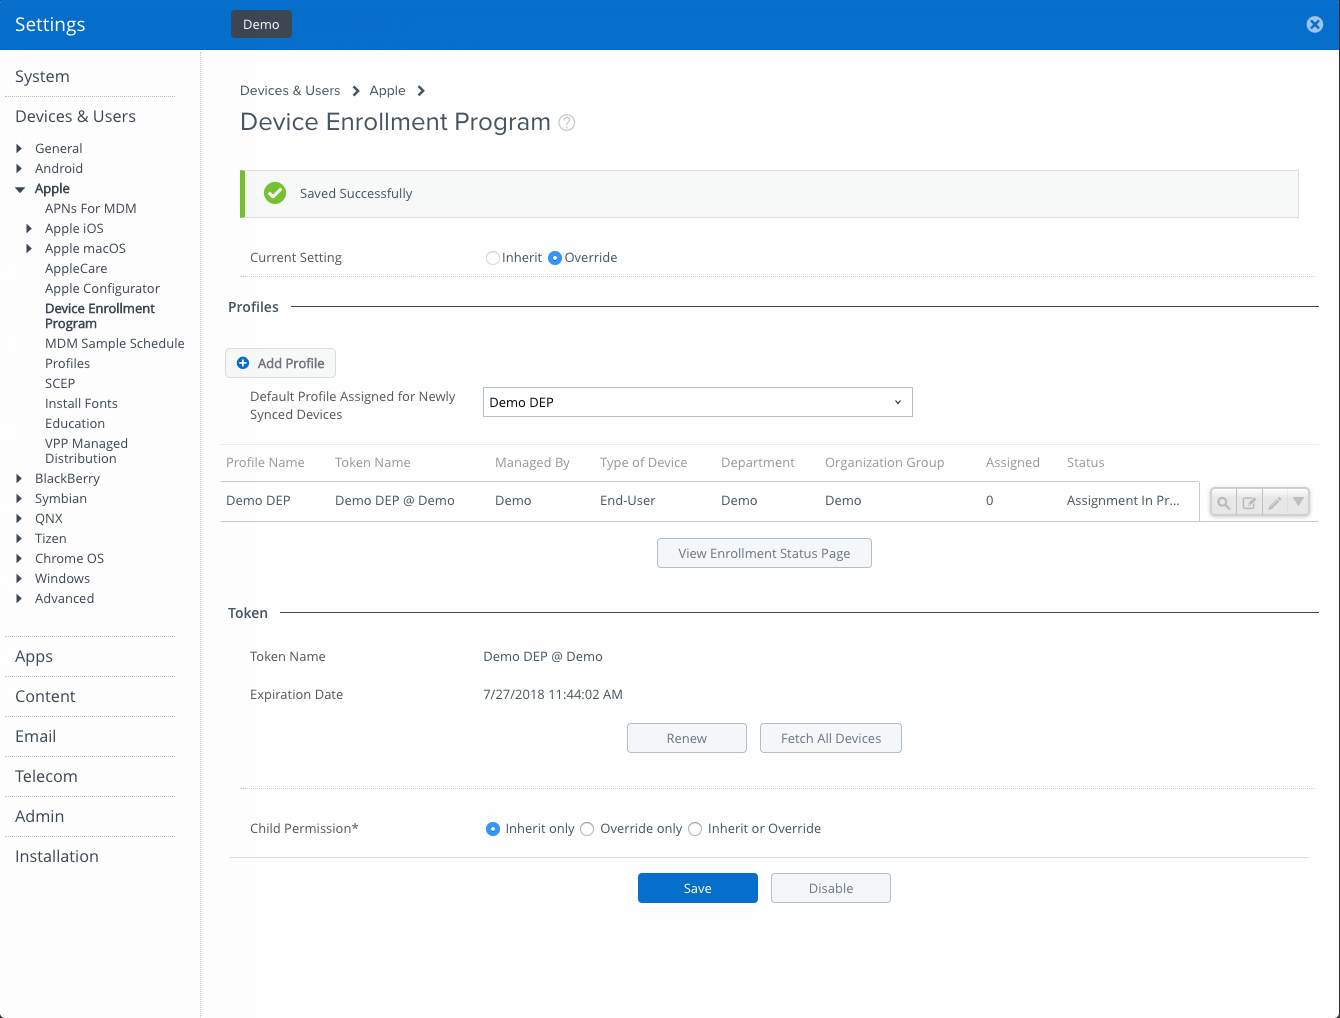
Congrats - you now have setup DEP and assigned it to your macOS devices… but you’re not done yet.
Configuring DEP Stage 3 - Assigning devices to a DEP server
Apple Portal
Now that you have a DEP profile assigned and set as default, you need to add some devices to your DEP server.
- In the Apple tab, go to Device Enrollment Program -> Manage Devices
- Under the Choose Devices By: section, select Serial Number and paste your serial number(s) into the window, each separated by a comma
- Under the Choose Action: section, select Assign to Server and choose the DEP server you configured earlier.
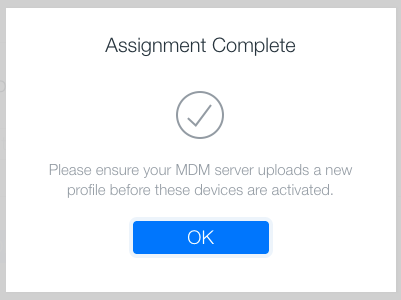
- Hit OK
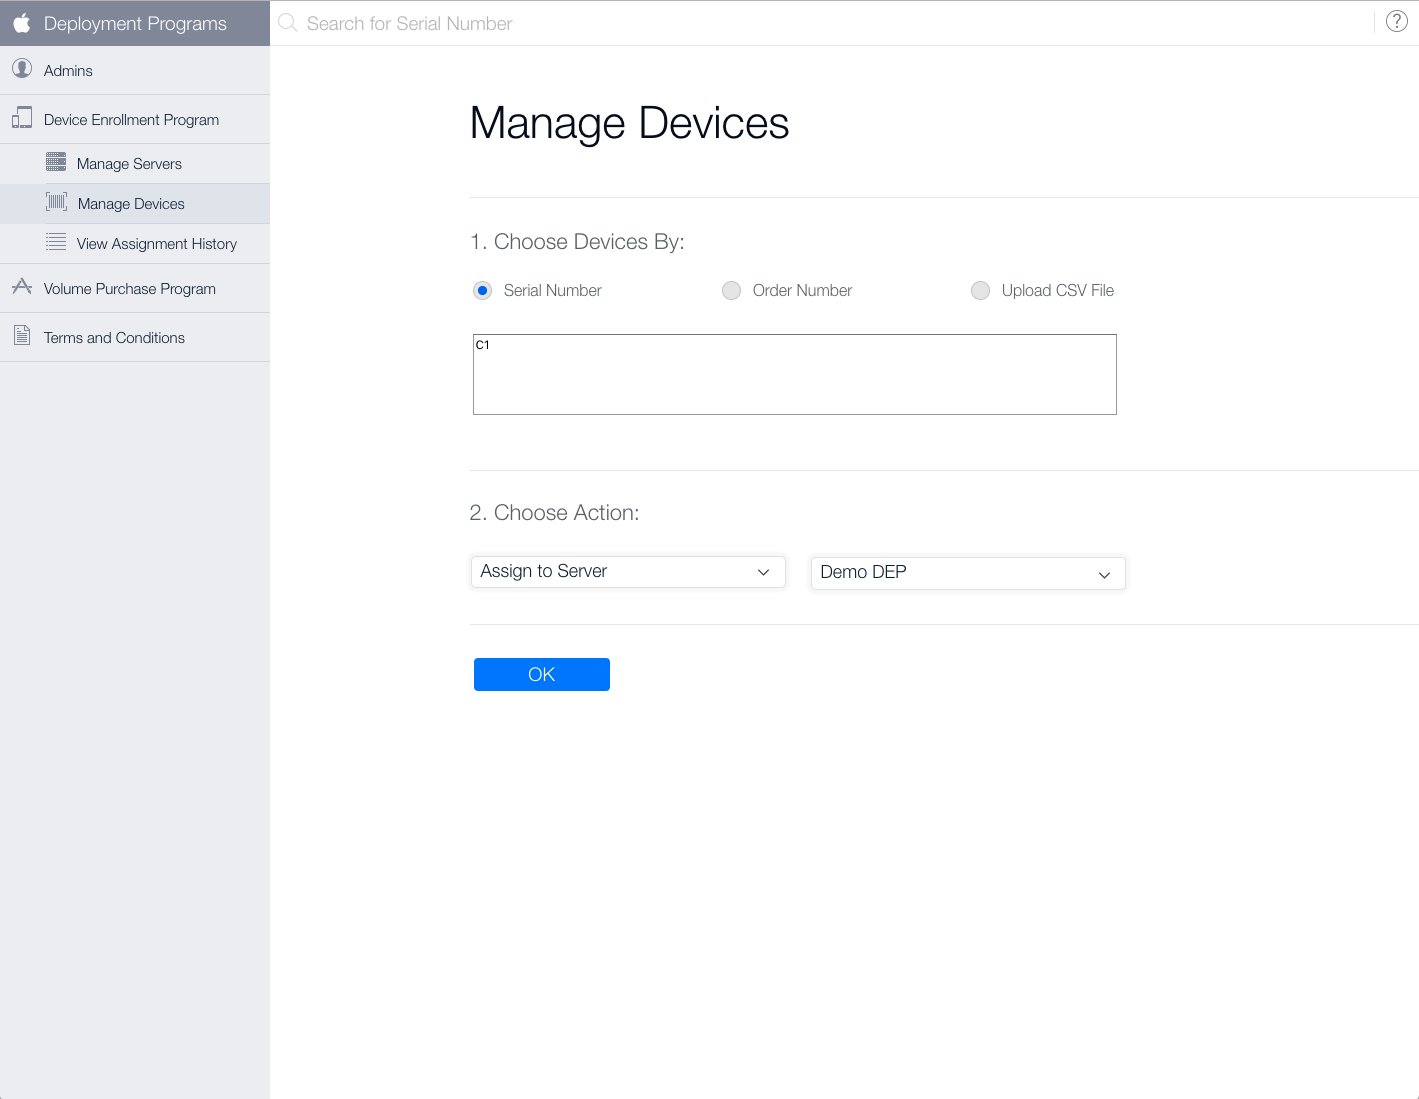
- If successful you will see an Assignment Complete window.
AirWatch console
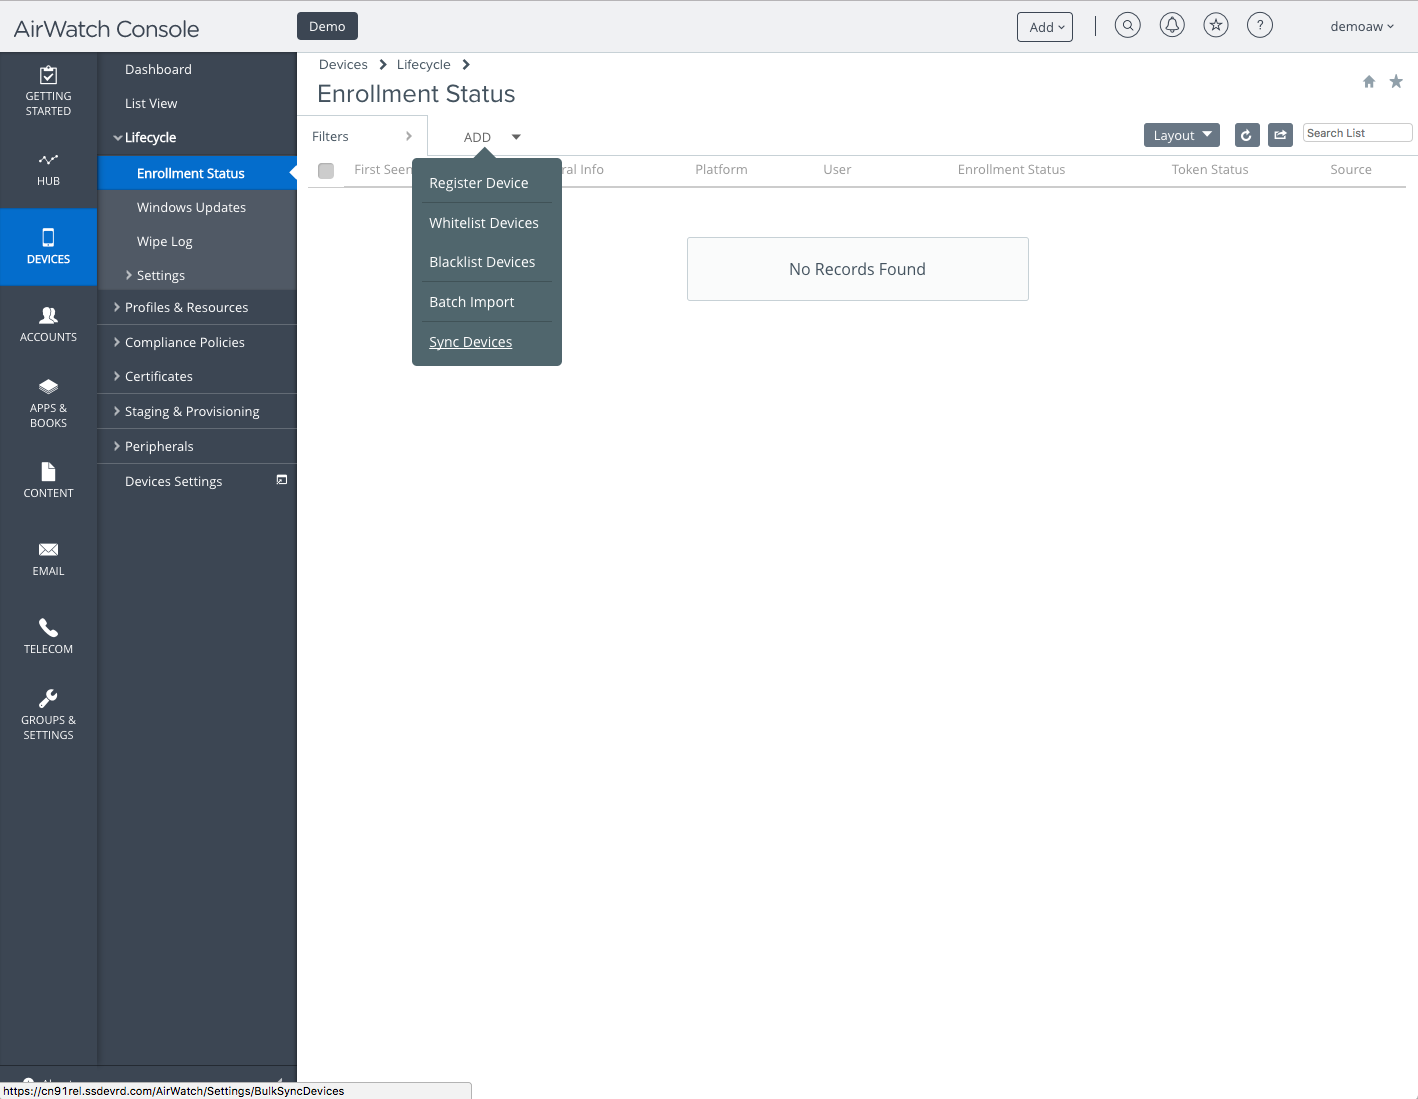
- In the AirWatch console, go to Devices -> Lifecycle -> Enrollment Status
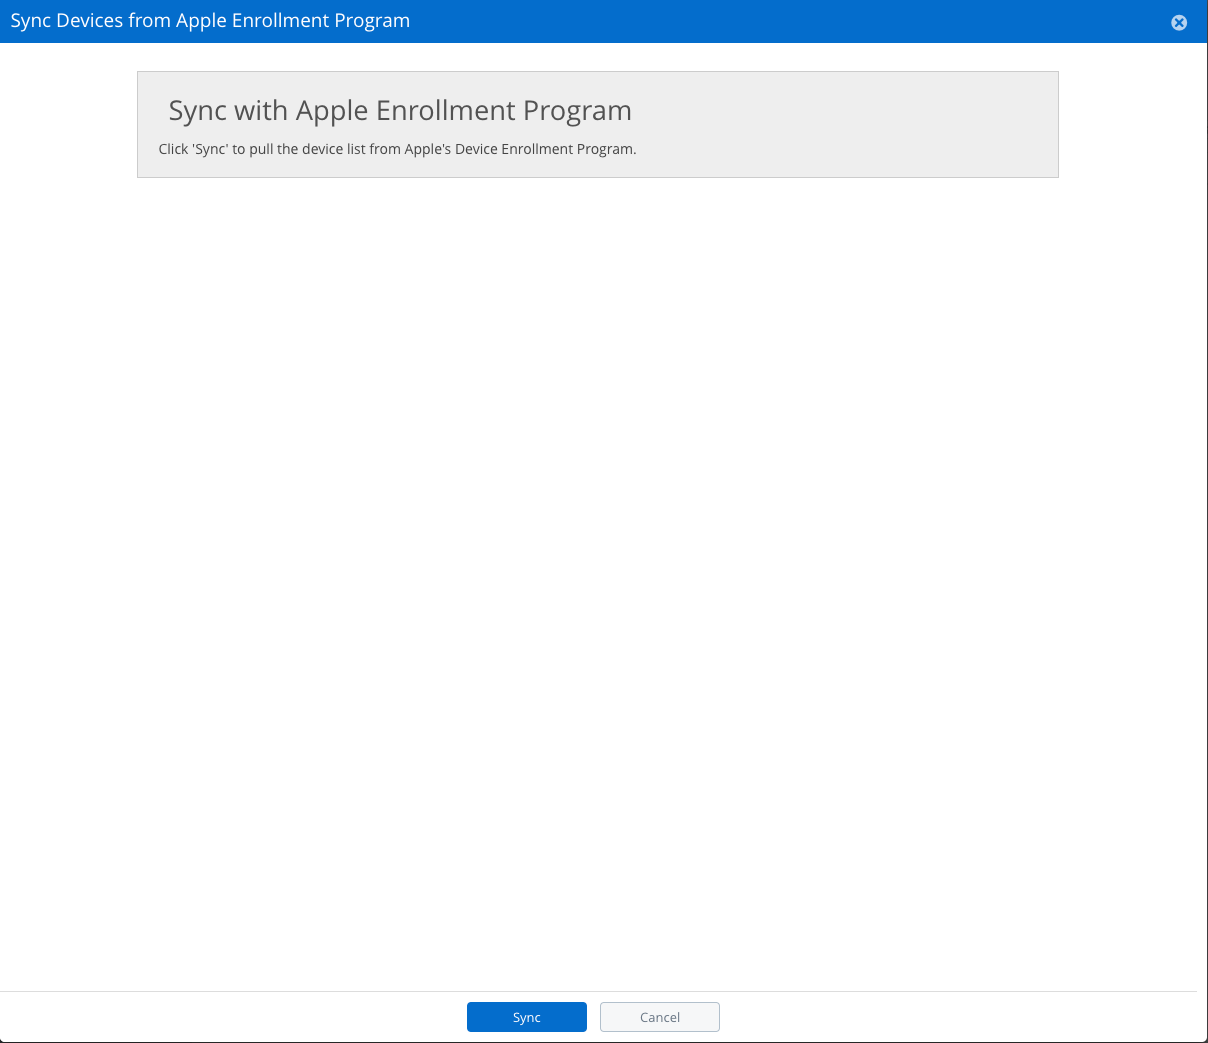
- Under the Add button, select Sync Devices
- You will be asked to confirm a synchronization. Select Sync
- If successful, your devices will show up in the Enrollment Status page
- If your devices have successfully been assigned your DEP profile, they will have a Registered status

Congrats - now you have macOS devices syncing, but there’s some more work to be done.
Configuring DEP Stage 4 - Adding a test user
In order to authenticate to DEP on your macOS device, you will need a user registered in the console. Typically this is connected to a directory service of some kind, but for this demo, we will setup a standard user.
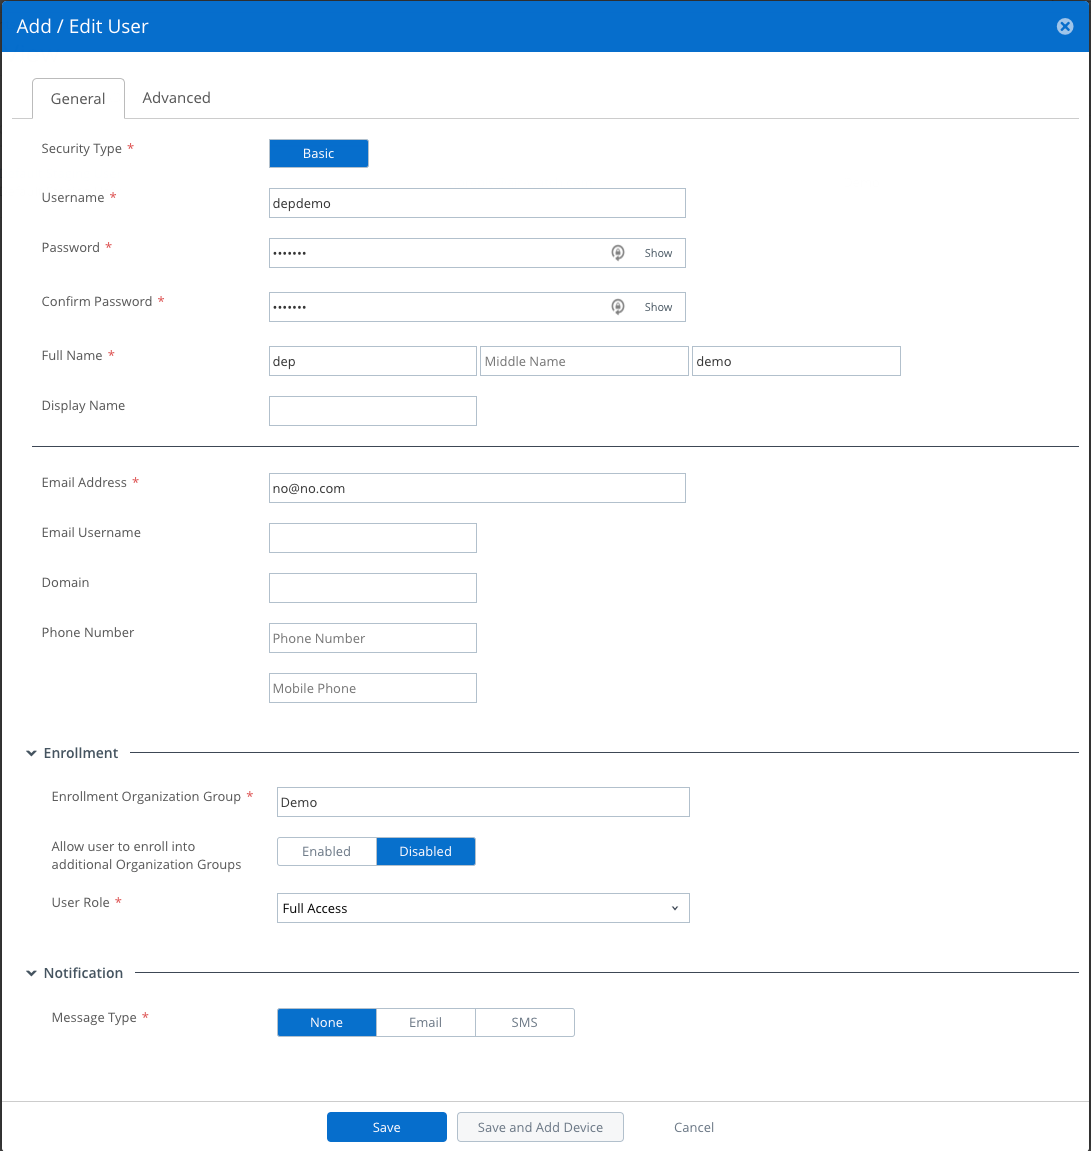
- In the AirWatch console, go to Accounts -> List View -> Add -> Add User
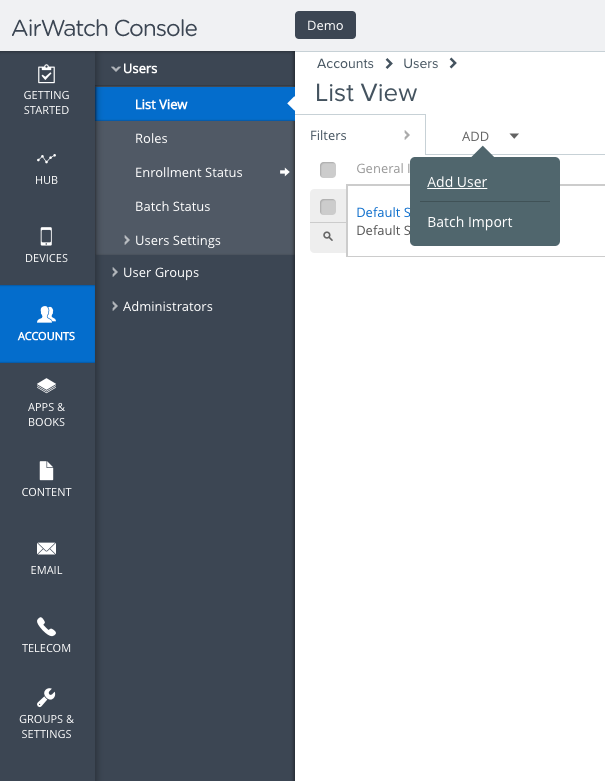
- Set the Usernane, Password, Full Name and Email Address
- Under Enrollment ensure that it is assigned the same Organization Group. This should happen by default.
- Under Notification, set it to None so no one will be e-mailed about this user creation.
- Hit Save
Congrats - you’re inching closer to being done, but there’s just a few more things to do.
Configuring DEP Stage 5 - Add and assign a custom DEP package
Now onto the fun part.
Assuming you have already created your custom DEP package (that is a signed, distribution package!) you can now easily add and assign it to your devices.
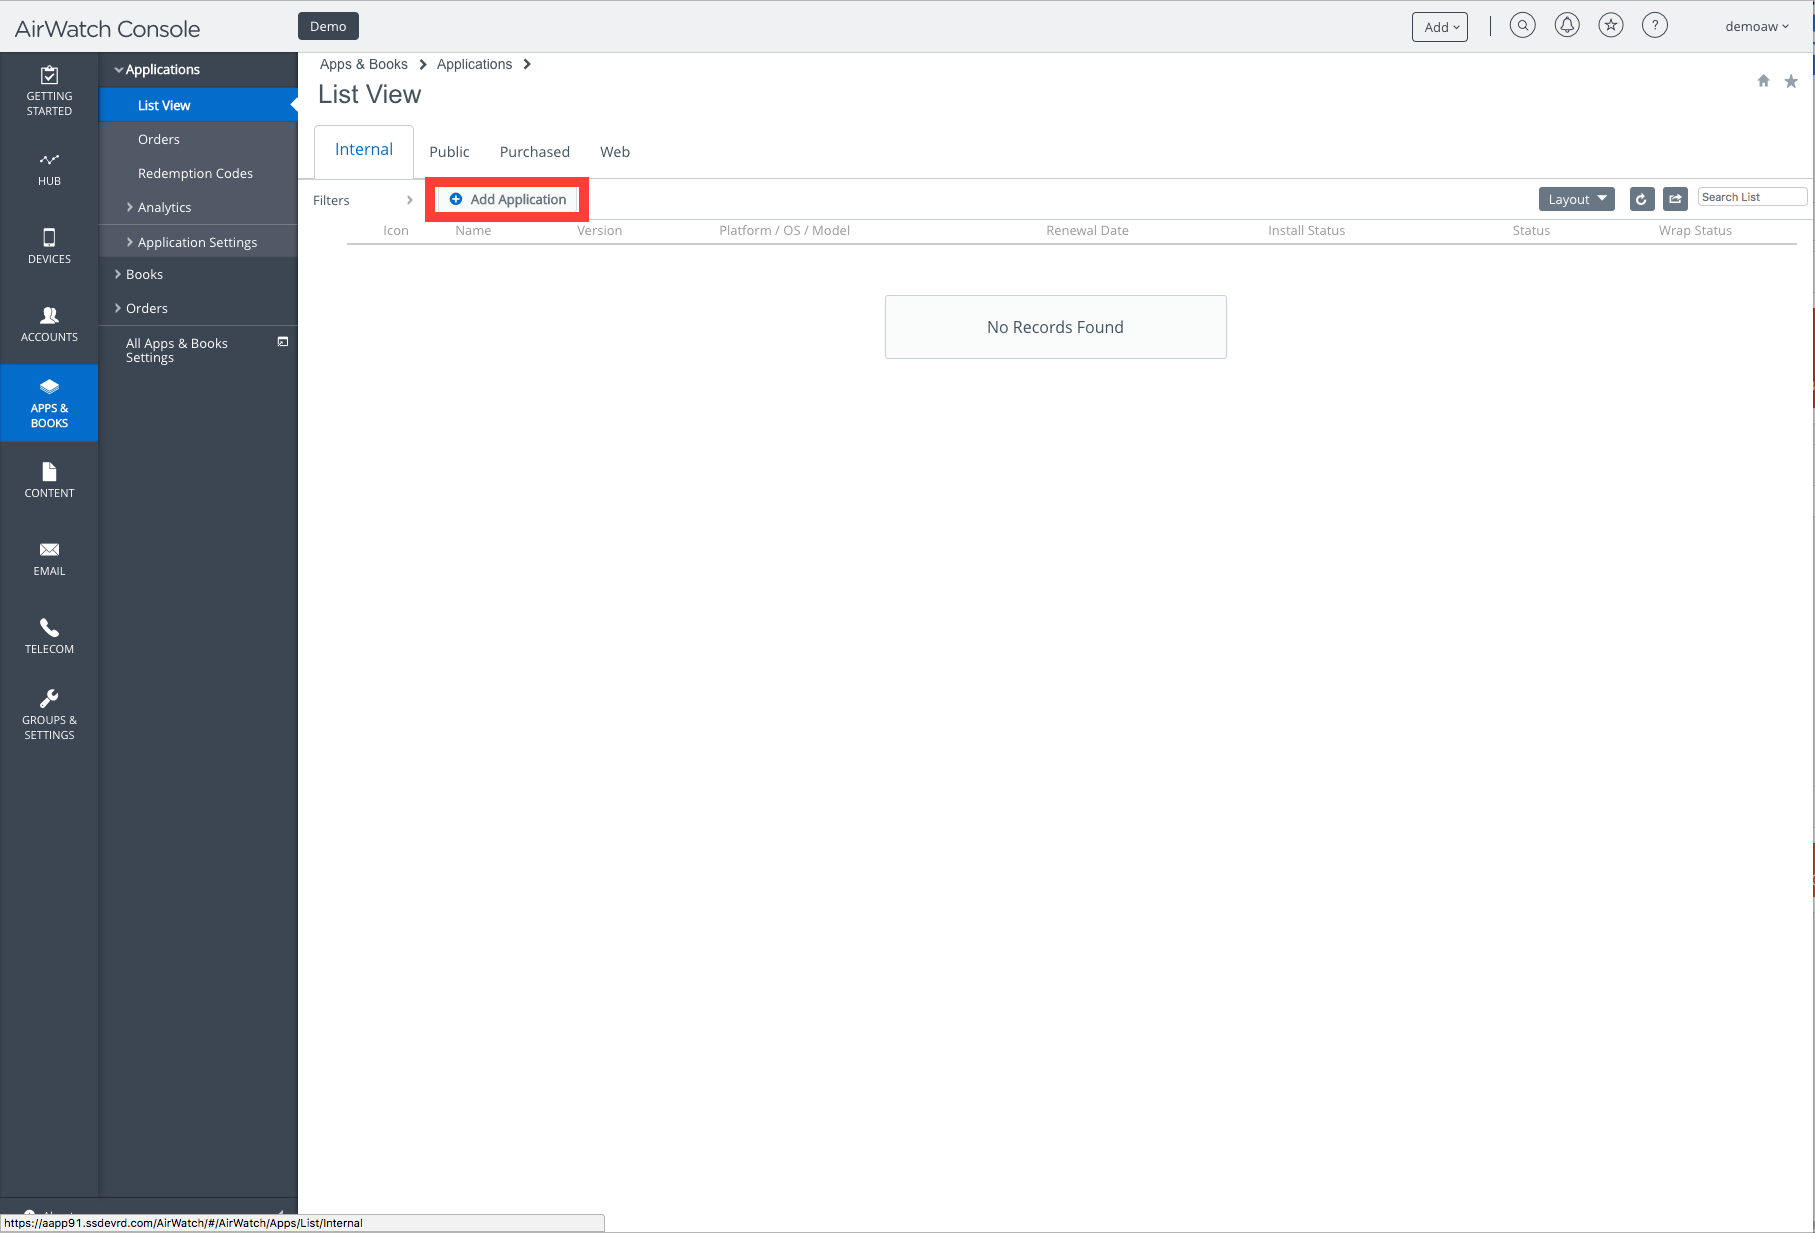
- Go to Apps & Books -> List View
- Under the Internal tab, select Add Application
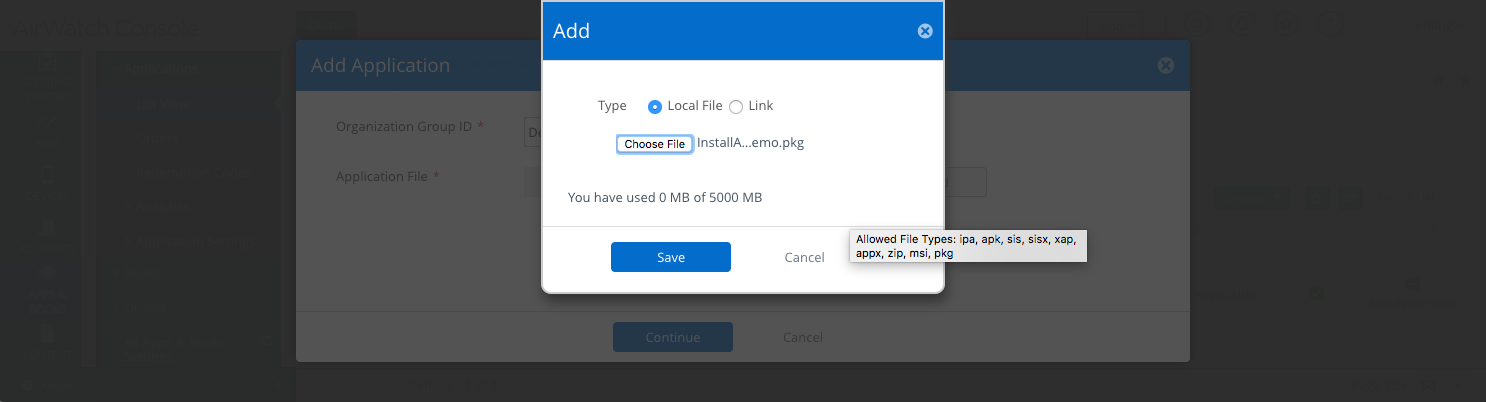
- Under Application File, select Upload.

- Select the type Local File and browse to your custom package.
- Hit Save
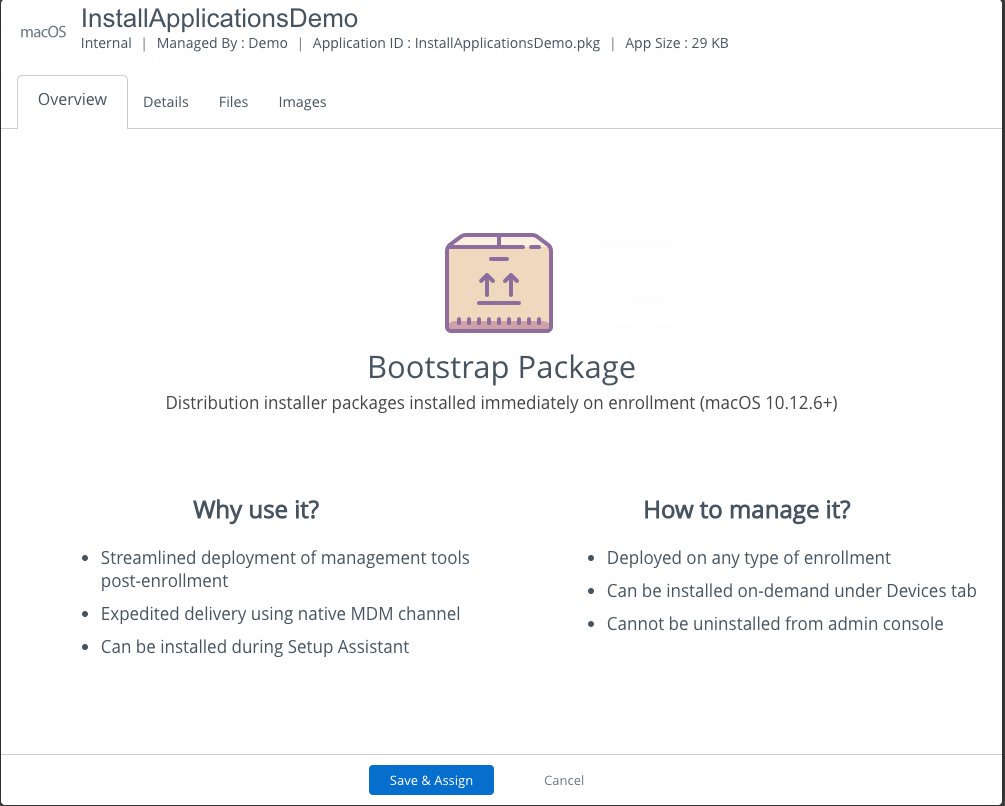
- If uploaded successfully, you will see it appear as an Application File
- Hit Continue

- AirWatch will detect that this is a DEP Bootstrap package
- Select Save & Assign
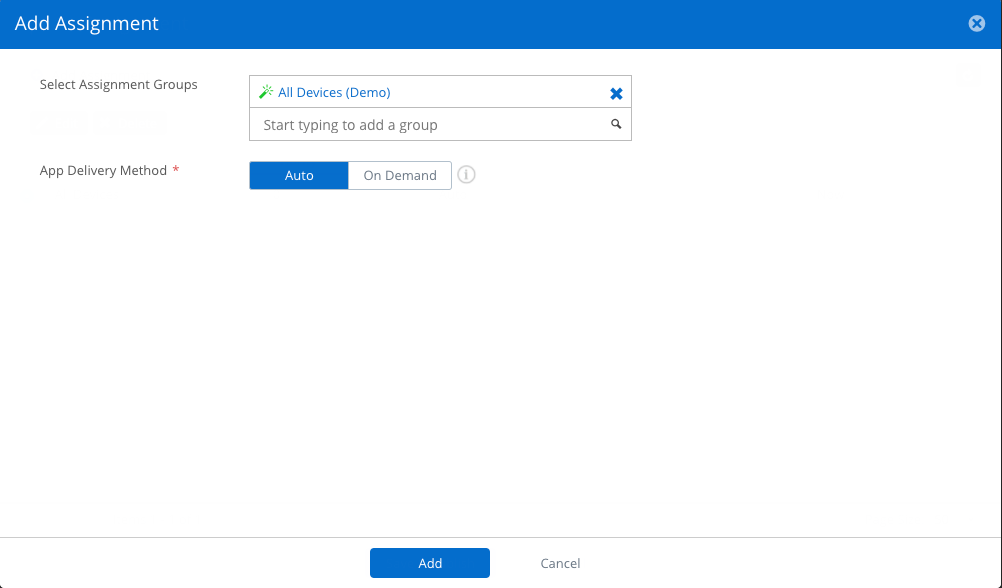
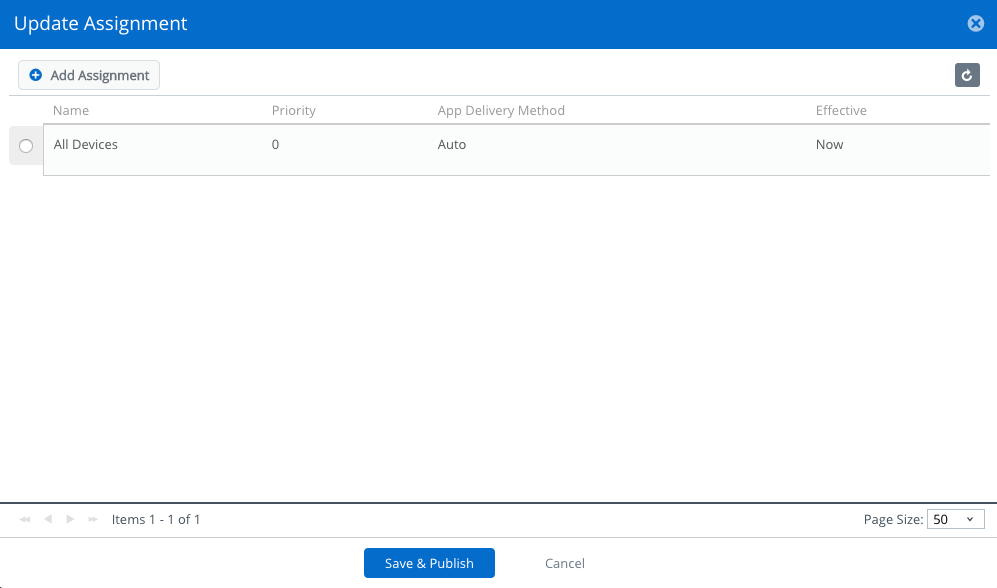
- In the Update Assignment window, select Add Assignment
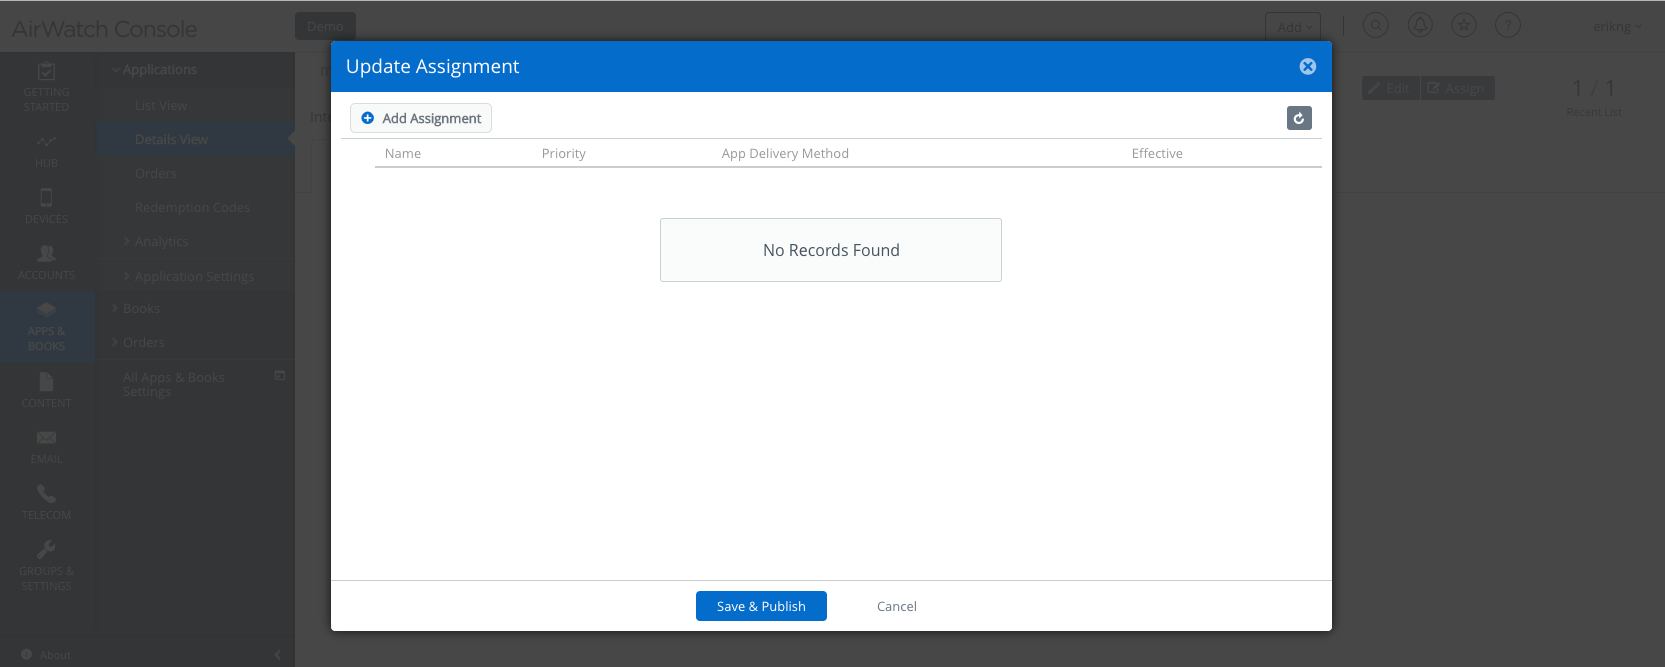
- Under Select Assignment Groups select All Devices
- Under App Delivery Method select Auto
- Hit Add
- Hit Save & Publish
Configuring DEP Stage 6 - Disabling AirWatch agent installation.
Through at least 10.13.4, you will not be able to reliably install both the custom package and the AirWatch agent. This is due to a macOS bug and was one of the reasons why AirWatch held off releasing this feature.
If you are using a tool like InstallApplications or munki, you may not need to have the AirWatch agent installed or you may actually install it through another mechanism.
To disable the agent:
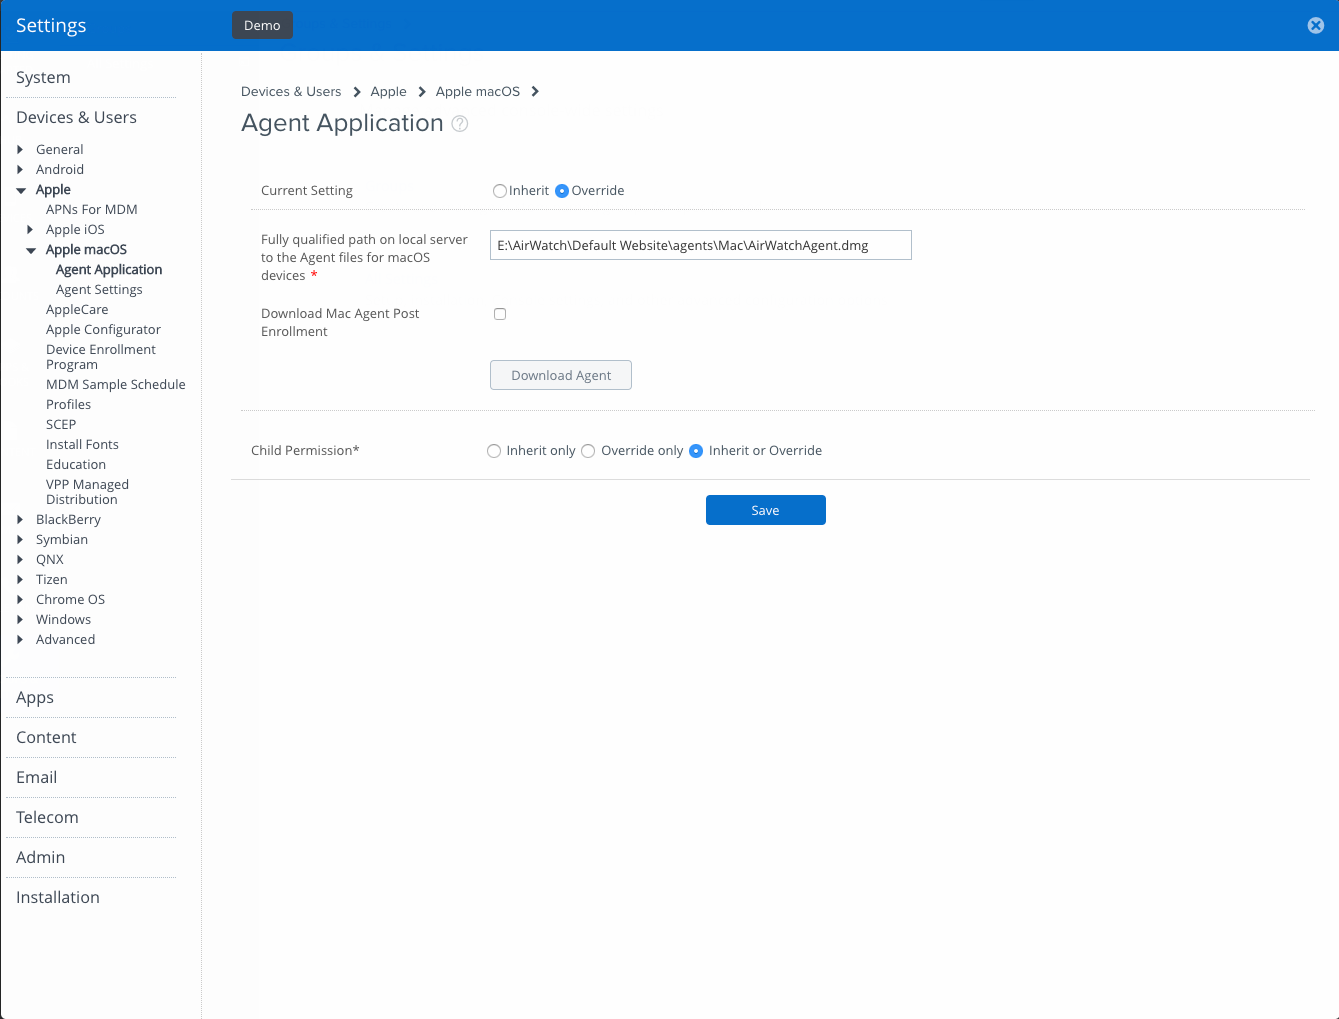
- Go to Groups & Settings -> All Settings -> Devices & Users -> Apple -> Apple macOS -> Agent Application
- Set the Current Setting to Override
- Uncheck the Download Mac Agent Post Enrollment option
- Hit Save
Congrats! You are DONE. Time to test! ![]()
Optional Step - Disabling AirWatch Catalog
By default, Airwatch deploys a web clip pointing to the AirWatch catalog. If you are using a tool like munki, you more than likely want to disable this feature.
To disable the catalog web clip:
- Go to Groups & Settings -> All Settings -> Apps -> Workspace ONE -> AirWatch Catalog -> General
- Go to the Publishing tab
- Set the Current Setting to Override
- Under Platforms set macOS to Disabled
- Hit Save

Notes about custom packages
While this post is to mainly describe how to get setup, you could easily create macOS groups internally that scope to specific custom packages. This would then allow you to have a production package that everyone gets, while also being able to use a test environment for your own devices. The ideas are endless.
Testing Custom DEP
This is the easy part.
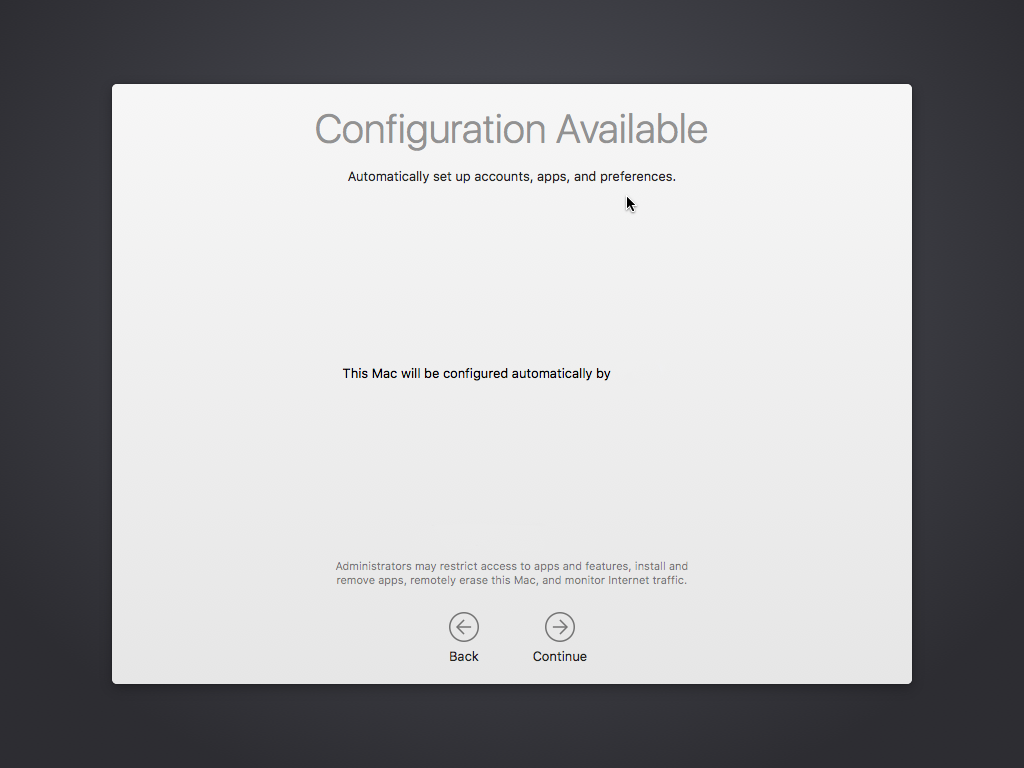
Turn on a macOS device that you’ve registered in DEP (or better yet check out my guide on how to create a DEP capable virtual machine with vfuse).
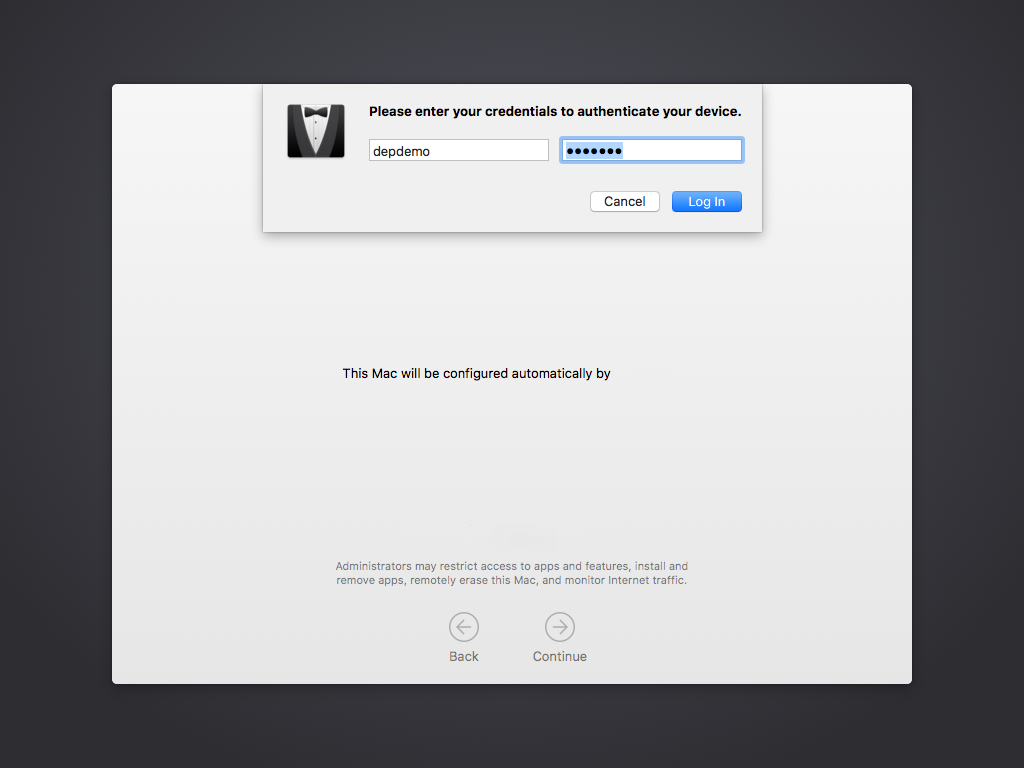
- If DEP worked you should see something like this
- If you set DEP for authorization, authenticate with the username you created earlier.
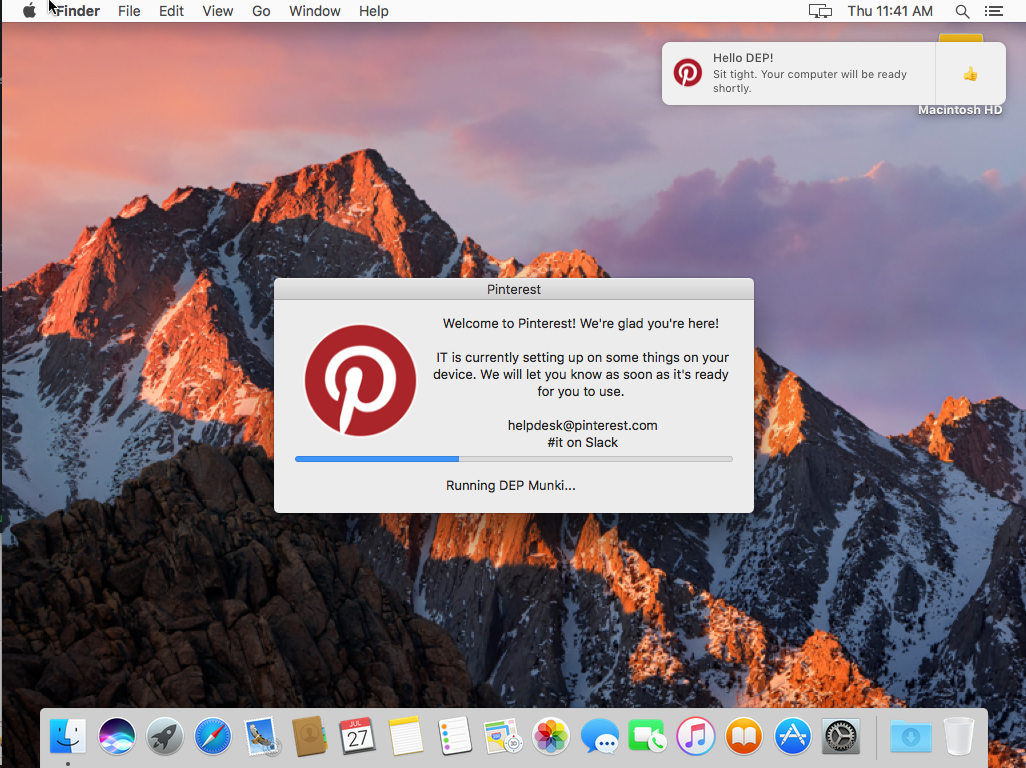
- Finish the Setup Assistant and get into the desktop.
- If you were successful, you should see the package installed. For myself, that’s a mixture of DEPNotify, Chef, Munki and Yo.
Final Thoughts
It’s been a very long time since I originally discussed the concept of custom DEP and since then multiple vendors have begun work on adding this functionality. I hope you have enjoyed this series and I look forward to hearing about your results.
For further reading, please see VMware’s GitHub repository on using the Bootstrap package feature.
Hey JAMF - how about you join this custom DEP thing?
Table Of Contents
- Requirements
-
Configuring AirWatch
- Configuring DEP Stage 1 - Registering with Apple
- Configuring DEP Stage 2 - Configuring DEP Profile
- Saving DEP Profile
- Configuring DEP Stage 3 - Assigning devices to a DEP server
- Configuring DEP Stage 4 - Adding a test user
- Configuring DEP Stage 5 - Add and assign a custom DEP package
- Configuring DEP Stage 6 - Disabling AirWatch agent installation.
- Testing Custom DEP
- Final Thoughts
- Table Of Contents